Search Lvl. 100 Crafts

Monday, October 30, 2017

Toasted Pumpkin Seeds

Roasted Pumpkins Seeds

sugar cinnamon roasted pumpkin seeds

This post was originally going to be done on Friday, but since that’s well after Halloween, I thought it might be a bit too late.  So, this week will be a bit backwards for my posts with my recipe being today’s post and my craft being Friday’s post.  

Since Halloween is tomorrow, a lot of people will be carving Jack-o-lanterns, and that means there will be a lot of pumpkin seeds.  I would hate for those pumpkin seeds to go to waste, so I decided to make my own cinnamon-sugar roasted pumpkin seeds.  I hope you enjoy; we certainly do at my house.

Ingredients:


  • 2-3 cups pumpkin seeds, separated from the pulp
  • 1 Tbsp butter, melted
  • 1 tsp brown sugar
  • ½ tsp cinnamon, ground


Directions:


  • Preheat oven to 300 F
  • In a large bowl, combine all ingredients
  • Spread evenly on a sheet (I used a 9 X 13 and it worked well)
  • Bake for 40-50 minutes, stirring twice

Friday, October 27, 2017

Spiked Apple Cider Cupcakes

Spiked Apple Cider Cupcakes

apple cider cupcake perfect for fall with cinnamon buttercream frosting and apple chips


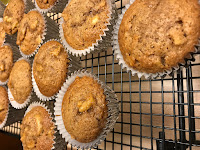
As you may have guessed from my last blog post, I am in love with apples this fall.  It’s really an underappreciated fall flavor.  After making my apple chips, I decided that I needed a cupcake to go with them.  While talking (and gaming) with a friend of mine, we decided that apple cider was the flavor to go with.  The idea for these cupcakes was born: spiked apple cider cupcakes (it’s spiked with brandy), topped with cinnamon buttercream frosting, and garnished with cinnamon apple chips.


Yields:

  • 24-30 cupcakes, depending on how much you fill your pans


Ingredients:


  • 3 cups flour
  • 1 ½ cups granulated sugar
  • ½ cups brown sugar, packed
  • 1 Tbsp cinnamon, ground
  • ½ Tbsp cloves, ground
  • 2 tsp baking soda
  • 1 tsp baking powder
  • 1 tsp salt
  • 2 eggs (room temperature)
  • 1 cup apple cider
  • ¾ cups vegetable oil
  • ½ cup brandy
  • 1 apple, finely chopped


Directions:


  • Preheat oven to 350 F
  • Line 2 cupcake pans with cupcake liners
  • In a medium mixing bowl, combine dry ingredients
  • Add wet ingredients to dry ingredients and mix well
  • Stir in the chopped apples
  • Fill lined cupcake pans until ½ to ⅔ full
  • Bake in preheated oven for 20-24 minutes or until a toothpick inserted in the center comes out clean


Cinnamon Buttercream Frosting


Ingredients:

  • 1 cup unsalted butter, softened
  • 1 cup shortening
  • 1 Tbsp cinnamon, ground
  • 4 cups powdered sugar
  • 2-3 Tbsp heavy whipping cream (optional), for thinner frosting

Directions:

  • Whip together the butter and shortening until light and fluffy
  • Add cinnamon and beat until incorporated
  • Add powdered sugar 1 cup at a time, mixing well after each addition
  • Add whipping cream 1 Tbsp at a time until desired consistency


Wednesday, October 25, 2017

Cinnamon Apple Chips

Cinnamon Apple Chips

low calorie fall treat baked cinnamon apple chips


It’s fall, and I love fall recipes; however, I feel there is one serious oversight when it comes to fall: the apple.  Pumpkin gets all the attention, but what about the wonderful apple?  It’s one of my favorite fruits, and I have found a wonderful way to eat these: as baked chips.  I found a recipe while on Pinterest, and of course made my own twist on it.  This recipe is super easy.  The hardest part is waiting for them to finish baking.  My entire family loves these, and they don’t last long at our house.  I hope you enjoy, and let me know if you add your own touches to this recipe.


This recipe yields about 1 ½ cups of chips.


Ingredients:


2 apples (I used Fuji)
1 tsp brown sugar, packed
½ tsp cinnamon, ground


Directions:

  • Preheat oven to 200 F
  • Slice the apple to about ⅛” thick.  I quarter mine, then cut the core from each section, then slice each quarter.  You can just core and slice for bigger chips.  However you want them is great

  • Combine the brown sugar and cinnamon in a small bowl
  • Place the sliced apples in a large bowl.  Pour in the cinnamon-sugar mixture.  Stir to coat the apples

  • Spray baking sheets with non-stick spray, and lay out the apple slices being careful not to overlap them

  • Bake in the preheated oven for 2-3 hours, until crisp
  • Allow to cool.  Store extras (if you have any) in an airtight container for up to 4 days

Monday, October 23, 2017

Painted Pumpkins

Painted Pumpkins

Painted Harley Quinn Pumpkin

Last year, my mom and I decided to do something new with our Halloween pumpkins.  We painted them.  They were so much fun and so easy, and they stayed fresh a lot longer than carved pumpkins.  Now, I have a friend who like Harley Quinn a bit too much, and I decided that a Harley Quinn pumpkin would be perfect (also, it’s easy which is a plus since my artistic abilities are less than stellar).  Let me know if you paint a pumpkin this year.

Materials:


  • Pumpkin (any size will do)
  • Paint (I used acrylic paint and it worked nicely)
  • Brushes (the sponge brushes are great for big areas)
  • Newspaper or paper bags (anything to cover your work space)
  • Clear acrylic finisher spray

Instructions:


  • Lay out your newspaper to protect your work area
  • Using the brushes and paints, paint your pumpkin with your desired design
  • Allow to dry for a few hours
  • Spray with the clear acrylic finisher spray

Friday, October 20, 2017

Chocolate Ganache

Chocolate Ganache

Creamy chocolate ganache filling for gourmet cupcakes

I am in love with baking, especially cupcakes.  There’s something about baking something that someone else will love that makes me very happy (it’s also a great stress reliever for me).  Along with the love of cupcakes came a time that I spent far more hours than I would care to admit watching Cupcake Wars.  In this show, I kept hearing about chocolate ganache filling.  It just sounded so decadent that I had to figure out how to make it and fill my cupcakes with it.  Fortunately, ganache is far easier to make than the name would imply.  This is the recipe that I use to make ganache for cupcake fillings.

When working with chocolate, be sure that all your materials are perfectly dry.  Any water can ruin your chocolate.

Ingredients:


12 oz semi-sweet chocolate chips (about 1 ½ cups)
1 cup heavy whipping cream

Directions:


  • Pour chocolate chips into a dry bowl
  • Pour heavy whipping cream into a dry saucepan.  Heat over medium heat until the cream starts to bubble.  Do not overheat, or you will scald the cream.
  • Remove from heat
  • Immediately pour over the chocolate chips so the chips are covered
  • Let sit for 1-2 minutes

  • Stir until the chips are melted and the ganache is a uniform consistency

  • If the ganache is not thick enough, refrigerate
  • After baking your cupcakes, core the cupcakes

  • Using a decorating bag, pipe the ganache into the cored cupcakes (or you can use a Ziplock bag with the corner snipped off)

Wednesday, October 18, 2017

Fall Luminaries

Fall Luminaries


Light up the path for Halloween with DIY luminariesLight up the path for Halloween with DIY luminaries


I have always enjoyed luminaries, and a couple of years ago I decided to line my walkway with these for Halloween.  I think I saw a picture of something similar in a magazine (probably Southern Living) and decided to make it my own.  Since these are made using leaves, they work well throughout the fall season, not just Halloween.  Think of having these out to welcome your family and friends to Thanksgiving dinner.

Materials:


Medium brown paper bags with handles
Leaves
Pencil
Cardboard
Xacto knife
Sand (or rocks, or something else heavy to put in the bottom)
Tea lights

Directions:


  • Place a leaf on what will be the front of the bag (maple leaves were my favorite), and trace an outline with your pencil.
  • Place the cardboard in the bag so you don’t accidently cut the back of the bag
  • Cut out the leaf using your Xacto knife
  • Fill the bottom with sand (or rocks or colored stones)
  • Place tea light in the sand and light when ready

Monday, October 16, 2017

Halloween Tins

Halloween Tins


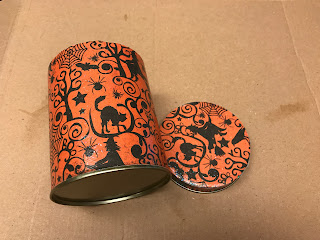
Old tins made new with mod podge and decorative paper


My mom was thinning out her Halloween decorations, and I was happy to add to my collection.  Among these decorations was a set of three Halloween tins that were pretty dated.  Since I have been doing a lot of crafting with Mod Podge I thought it would be fun to upgrade these old tins.  I loved this project and will probably now find others to update.  Let me know if you make these.  I can’t wait to see what you all come up with.


Materials:


Old tin
Measuring tape
Decorative paper
Pencil
Scissors
Mod Podge
Brush (I prefer sponge brushes)
Washi tape (Optional)


Directions:


  • Measure the tin height and circumference using the measuring tape.


  • Cut your decorative paper to the measurements. (Mine was 4 ½” X 11”)
  • Using the pencil trace the outline of the tin’s lid on the back of the decorative paper and cut out the circle.


  • Measure the height of the lid, and cut a strip of paper using the height of the lid and the circumference (Mine was ½” X 11”)
  • Using the brush, apply a thin layer of Mod Podge to the tin.


  • Carefully, place the largest of the paper pieces to the tin over the Mod Podge, smoothing as it goes around.
  • Using the brush, apply another thin layer of Mod Podge to the top of tin’s lid.


  • Place the circular piece of paper on the top of the tin’s lid, and smooth
  • Using the brush, apply yet another thin layer of Mod Podge to the side of tin’s lid.


  • Carefully, place the last piece of paper around the edge of the lid smoothing as you place it around the edge.


  • Allow these to set for a time.
  • If you choose, you can put the Washi tape over the thin strip on the edge of the tin’s lid.
  • Using the brush, apply a thin coat of Mod Podge (I used the sparkly formula) over the tin and the lid.


  • Allow to dry.